Set Up a Slideshow
Your dashboard panel as a set of more than one slide, each one with meaningful metrics and KPIs
Overview
Your dashboard panels are critical to transmit information to your team, if you clutter them with every single gadget you think is important, you will end up with a messy panel. Your gadgets should be as visible (big) as possible.
To alleviate this situation, you can configure a slideshow: Your dashboard panel as a set of more than one slide, each one with meaningful metrics and KPIs, and each one of them with the right amount of time in screen.
Size matters when it comes to information radiators—the bigger the better.
Set up a slideshow
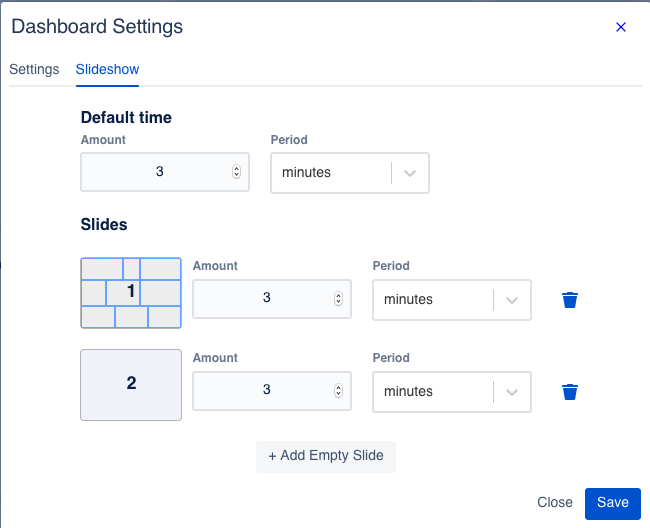
To add slides to your dashboard panel, access to your Dashboard settings in the top right … menu:
Select the Slideshow tab.
Set the Default time. This is the time that all the slides by default will be displayed in the screen. When the time is up, slides move to the next one.
Click on + Add Empty Slide to add more slides to your slideshow. You can set individual time periods for each one of the slides.
The :trash_bin: button deletes the slides individually
Click Save.
When you are in the edition mode (click on the Edit button in the right top navigation bar), you can find controls to add or remove slides too.
Slideshow mode
When you view a dashboard with more than one slide, a :vid_play: play button appears in the middle of the top navigation bar. The slideshow mode is on!
This is also the default mode that users see when accessing to a dashboard using a public link (see Learn about Public or External Sharing to learn how to share a dashboard externally). It’s optimized for large screens or TVs, check Set Up a Wallboard for further information).
See also
- Set Up a Wallboard
Set up your information radiator: A wallboard
- Create, Edit, Clone, Delete and Export your Dashboard
Easily create and edit your dashboard layout, add gadgets, set access restrictions or share it
- What is a Dashboard?
A dashboard is a visualization tool that helps your team to track their work: Monitor environments, visualize sales, detect incidents, analyze performance, track projects and so on.
- How to Build your Central Data Hub
Centralize your data by turning Jira and Confluence into the Central Data Hub of your organization